Having been a cycling noob, like two years ago, I can remember going through quite a bit of consternation concerning my road bike’s shifting… It seemed so illusive to be able to dial it in just right, almost like I had to be lucky.
Today I can dial it in, usually, in about five seconds. When I can’t, I replace the cables because something else is wrong (that’s for a much later post though). Like previous posts, fear not, this one will have a lot of photos for you and I promise, this is not over your pay grade – and if you still think it is, I’m going to take the time to explain how everything works so by the time we actually hit the greasy parts, your mind will be at ease. So please, stay with me a second here Sue. Give me a chance, my friend…
Modern day road bike “integrated brake levers and shifters”, commonly referred to as “brifters” or simply “shifters”, are a marvel of cycling efficiency. The newer electronic shifting and the newest wireless shifting are so “next level” and simple, we needn’t even get into them. If you can operate your two pointer fingers, that’s all you need for electronic shifting. Everything else is automatic and done for you. So, if you really hate shifting and everything related to it, and have the cash, upgrade your bike to electronic shifting and all you’ll have to remember is to charge the system once every 1,000 miles or so (and the newer models have battery life indicators). Sadly, that’ll cost you between $1,500 and $4,000 depending on the system you go with. With that out of the way, because I like charging my “shifters” with a hamburger, fries and an ice-cold Coke after a good ride, let’s delve into the wonderful world of shifting so we can get yours squared away with a minimum of effort. First things first: You can’t break your bike bad enough that your local shop can’t fix it. So don’t be too afraid. Worst case scenario is you have to take your bike into the shop to have the “index adjusted”… To keep this post from getting into the 3,000 word range, I’ll do the rear derailleur today and the front next week.
The Rear Derailleur
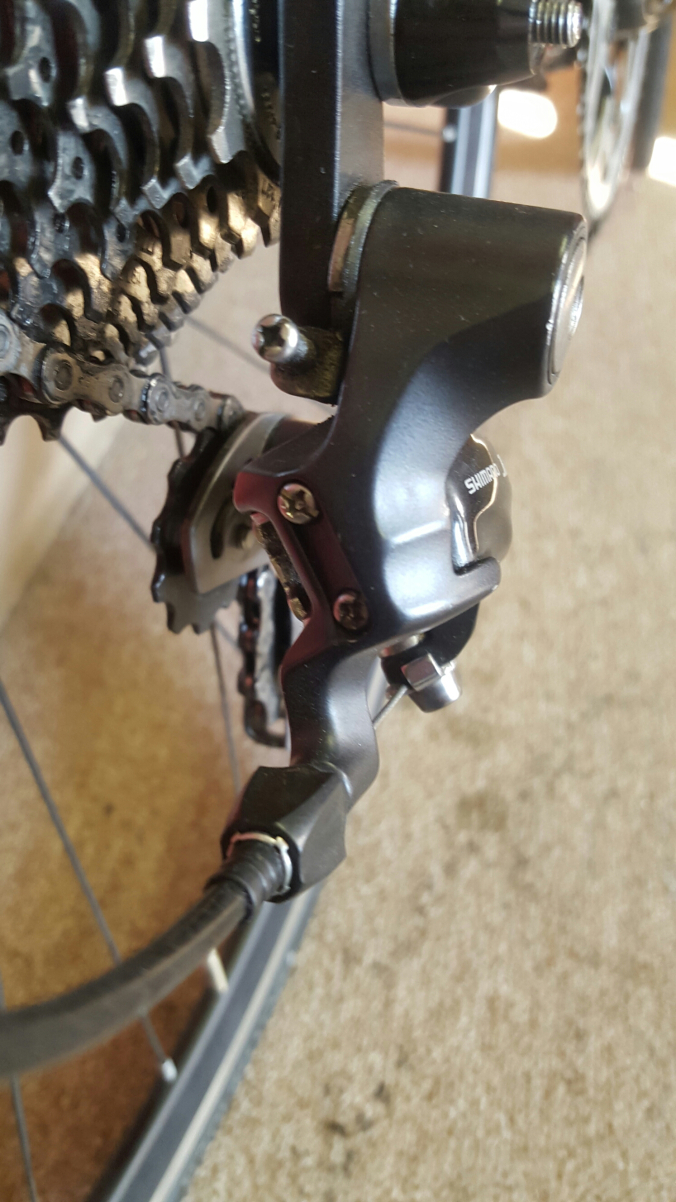
Before we get into this, at no time will we be messing with the set screws… Those are never changed unless you drop your bike or install a new cassette (back gears). Even with a new cassette, you probably won’t have to mess with the set screws. There are three and they look like this on the rear derailleur:
Index refers to the amount the derailleur moves when you click your shifter. When indexed properly, one click on the shifter equals the distance it takes the derailleur to shift the chain exactly one gear. If the index is out of adjustment, meaning the cable is too loose or tight, the derailleur moves too much or too little for each gear, so we’re looking for the butter zone in between. Make sense? Now, there are varying degrees of “out of adjustment”. Mildly out presents itself as the derailleur hesitating either going up or coming down the rear cassette. For the purpose of this post, we’re going to think of the cassette as a hill. “Going up” the cassette means we’re going up the hill to an easier gear. “Going down” the cassette means we’re shifting down the hill to a harder gear (in the back, big gears are easy, small are harder – it’s opposite that up front). Say the more common problem, going up the cassette to an easier gear, is vexing you… You move your shifter lever and you hear a click, click, click in the chain coming from the back of the bike and then it shifts, or if it’s barely out, the derailleur just hesitates a portion of a second before it shifts. On the way down the cassette, in the mild case, shifting will be crisp and fast – almost instantaneous. You click the shifter to a harder gear and the derailleur shifts, bam… that fast. The common cause of this is called “cable stretch”. The cable that runs from your shifter is under stress as the gears get bigger in the back… Over time, that cable stretches out a little bit (especially after installing a new cable or a long ride involving a lot of shifting) so the cable tension has to be adjusted to take up the slack. We do this by turning the barrel adjuster and rather than get into “clockwise” and “counterclockwise”, we’re going to make this exceptionally simple: You turn the adjuster in the direction the derailleur is hesitating (I’ve been using this simplification for years and you literally can’t mess up if you follow this).

So, we use the outside edge of the barrel adjuster as the starting point. If there is hesitation going up the cassette then we turn the adjuster the direction of the hesitation (counterclockwise), just a quarter turn at a time, until the shifting is crisp both up and down the cassette:
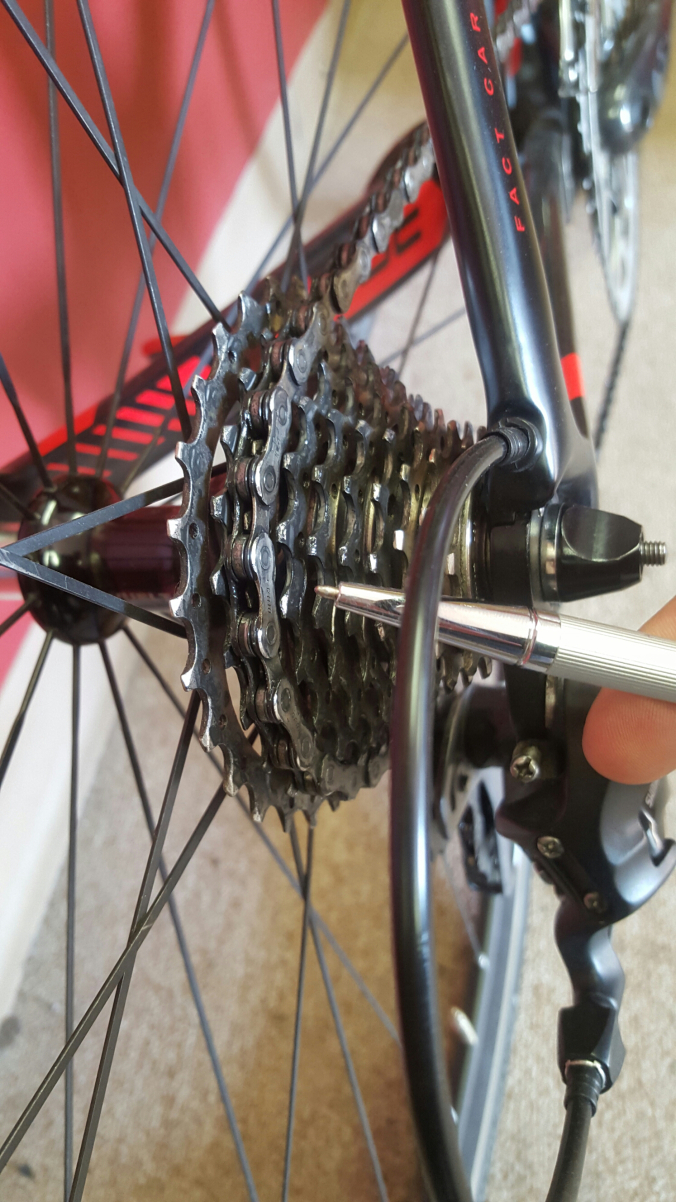

If it hesitates going down the cassette, we turn the adjuster’s outside edge down (clockwise), in the direction of the hesitation… Again, just a quarter turn at a time until it doesn’t hesitate. Easy enough, right? Indeed. Now, the instructions given above are good only if you’re out on a ride and your shifting starts hesitating on you (assuming you’re not out in the rain and getting schmutz in your gearing and cables – if you are, don’t adjust anything unless it gets so bad, you just have to. Chances are you’ve gotta clean out the cable housing or, for exterior cabling, lube the bottom plate where the cables pass under the bottom bracket (the photo is where your plate would be – my Venge has internal cable routing so it doesn’t have one – see, the cables go back inside the frame? For exterior cables, one goes to the front derailleur and the other follows along the rear chain stay to where it loops back around in a housing to the rear derailleur):

If, however, you’re going to do the adjustment before your next ride, you’re going to need to move the pedals to shift, so you need a stand (so you can pedal with one hand and shift with the other).
The other way, of course, is to just flip the bike upside down and handle it that way – you just have to make sure that you’re turning the adjuster the right way though… (it’s the same – counterclockwise for hesitation going up the cassette, clockwise for down the cassette). This is why “up the cassette, down the cassette” works so well, you don’t have to worry about confusing yourself if you choose to quickly flip the bike upside down to address a shifting issue:

Okay, so that takes care of a mild hesitation, but what if you’re so out of adjustment that when you shift, you just get a click, click, click… and it won’t shift? Or worse, what if you’re missing gears – either it won’t shift to the smallest or biggest gear in the back? Well, that takes a little more effort, and sometimes you run out of adjustment with the barrel adjuster. I can explain, very simply, how do address the issue under both scenarios.
First, with the barrel adjuster: Shift all the way down to the smallest gear that you can get to in the back. If it won’t go all the way down, don’t worry, use the shifter till you run out of clicks. Now, with the gear on the smallest cog that you can shift to, pedal the bike with your right hand and turn the barrel adjuster “down the cassette” or clockwise until the chain drops into the last, smallest gear… Then, keep turning, counting the turns, until you hear a little click, click, click. Okay? Now, your sweet spot is somewhere in the middle, between where the chain dropped down to the proper gear and when you heard the clicking from going too far. Turn the adjuster back the other way (counterclockwise, or up the cassette) and try to get it half way in between those two points. All of the clicking should be gone. Now, shift up the cassette (to easier gears)… Does it hesitate going up? If so, turn the adjuster a quarter-turn up the cassette. No hesitation? Keep shifting till you get to the biggest gear and then shift back down… Hesitation? If so, turn the adjuster down the cassette a quarter-turn until there is no hesitation. Then check the other direction, going back up the cassette. No hesitation? You’re done. Hesitation going up? Now we go with 1/8th turns. Turn the adjuster an eighth of a turn up the cassette. Keep shifting and adjusting until the derailleur shifts like butter, both directions. Now, ride happy.
This is fairly common (I end up adjusting mine every few weeks or so – sometimes even more often) so don’t be complacent with bad shifting. Just take a second to dial it in – and remember this: The more you stay on top of a hesitating derailleur, the easier it is to dial it in. When mine acts up, usually I can give it an eighth of a turn or two at a stop, hop back on my bike and be done with it.
Now, if you run out of barrel adjuster… Your barrel adjuster won’t turn one way anymore, fret not. This is easy too.
With your bike on a stand or upside down (as long as the rear wheel is off the ground, you’re good), shift to the smallest gear – this is IMPORTANT, the smallest gear you can shift to… Make sure you’re out of turns with the barrel adjuster. Then, you simply loosen the bolt that holds the cable to the derailleur:

Once the cable is loose, turn your barrel adjuster several turns the other way so you have a few turns either way (I go to the trouble of turning the adjuster all the way until it stops going the other way and count the turns, then divide by two and I should be right about in the middle. With the adjuster somewhere about the middle, pull the cable tight with a pair of pliers, tighten the bolt and complete the steps above for the complete index (the paragraph, four above this, that starts with “First, with the barrel adjuster”).
Now, if after trying all of this, you still can’t get your rear shifter to stop hesitating, you should probably take it to the shop and let them fix it. If it were me, I’d change the cable (for my Trek), though we haven’t gotten that far yet in these posts. When I had this same thing happen three weeks ago to the Venge, I took it in and had all of the cables and housings changed. The bike shifts like it was new again.
*** Shifting to the smallest gear and why it’s important when adjusting derailleurs. Derailleurs are simple. The cable tightens when you shift to a bigger gear. The tightening cable “pulls” the derailleur into the next gear… When we’re indexing a derailleur, we always start where the slack is, in the smaller gear. In the back this is the hard gear. In the front, it’s the easiest one. When we’re dealing with big adjustments, not just a simple hesitation up or down the cassette, we always start with the smallest gear because that’s where the slack is.

This is really good – nice and clear. Did you ever do one on the front derailleur?
LikeLiked by 1 person
Thanks, Andy. I’ll check…
LikeLike
I don’t, Andy. Not a good one, anyway. I’ll work something up in the next week.
LikeLike
Pingback: Bicycle Maintenance with Professor Jim: Shifting, from How it should Work to Making it Work (The Front Derailleur). « Fit Recovery